Wednesday, December 11, 2013

DIY Light Wall...SPOILER ALERT: It's a wall of lights

'Tis the Season for festive merriment and audacious displays of lights!
(Superheroes not included)
Fine, I made this light wall in October, but it was a Halloween Party HIT! It all started one night when I was watching some D-rate movie about a high school reunion. There they were standing in front of what looked like a waterfall of Christmas lights. From there I simply HAD to have it. Sadly this was in June and strings of Christmas lights were no where to be found in stores. I slipped in to my patience pants and waited until October...then it was GO time!!

Supplies:
  • 2 pieces of wood that measure the distance you from one end of the wall to the next
  • Strings of LED Christmas lights (you must use LED because you will need to attach lots of strings together)
  • Hooks
Take each piece of wood and measure out where you want each hook. I did a hook every 1.5" apart...which resulted in 90 hooks that needed to be put into each piece of wood (top piece and bottom piece). I pre-drilled all of the holes to screw the hooks into, but about 5 hooks in my hands were already blistered and hurting. No worries, only 175 more hooks to go! 

Once you have all the hooks in, simply hang one piece of wood to the ceiling of where your wall will be and put the other piece of wood on the ground below it.


Finally, just wind your string lights up and down from the hooks. When you get to the top or bottom, space them out by stringing them through the next hook to the side. 

There you go...now you have your Christmas Light Wall / Romantic backdrop for al fresco dining / Backdrop for Party Pictures / Twinkle-torium!!! 

Tuesday, December 10, 2013

I'm Too Immature For Crossfit

I have determined that I am FAR too immature for Crossfit. The stuff that comes out of people's mouths just cracks me up, but when I look around to see if anyone else is giggling I always find myself alone.

Example 1: I was mid workout when two boys were talking about which movements tire them out faster. "Snatch is faster than Jerk". Yes, I would hope snatch would get you there faster then jerking. What? I'm the only one with the mind of a middle school boy around here?!

Example 2: The trainer is trying to convince me that the squats I am about to do will help my stiff gluteal muscles. "Just think of the squats as opening up your butt". Umm, no thank you. I would like to keep my butt nice and closed.

Example 3: In order to roll out a sore muscle in their hip flexor, someone is rolling on a lacross ball on the ground to the point where it simply looks like they are humping the floor. Am I the only one seeing this?!

Then they go and name half the workouts after girls!

Trainer "We're going to do Annie this week."
Student "What? We just did Annie last month, we can't do the same girl."
...how is nobody responding with 'yea, I keep my girls in heavy rotation' and then walking out with a pimp limp?!


 Maybe I just need to grow up...or not.

Monday, December 9, 2013

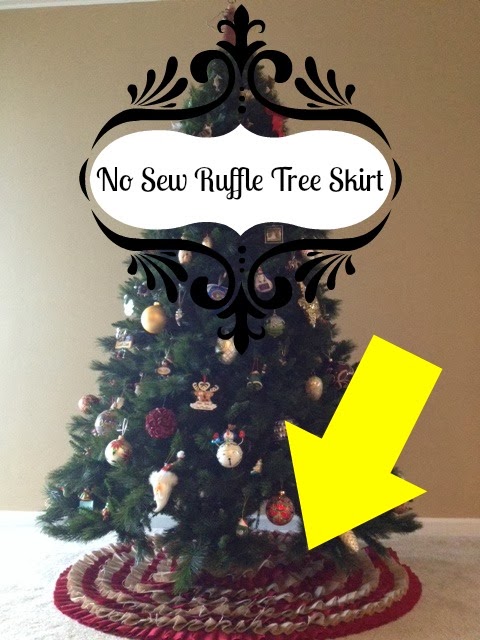
DIY No Sew Ruffle Christmas Tree Skirt

I needed a new tree skirt very badly. I got the tree skirt I have now back in the day when I had a fiber optic Christmas tree. Yeah, wrap your head around that tackiness. 

I loved the monogrammed tree skirt at Pottery Barn, but surely I could create a tree skirt I loved just as much for less than $130. Sadly I have never used a sewing machine, so that limits my craftiness. (One day I will learn, I swear)

After a quick trip to Jo-Ann Fabrics and I was set with all I needed to make my NO SEW ruffle tree skirt. Pssh, no sewing, this has to be easy, right? WRONG!! This was a very tedious and time consuming project. But it was worth it in the end.


Supplies Needed:
  • 2 yards of burlap
  • 2 yards of fabric with a little bit of density to it
  • hot glue gun with hot glue sticks out the butt (seriously, you need a lot)
  • your old tree skirt
  • pins (optional, but it makes life a lot easier)

Start by cutting your strips. I used 3" strips, but it's up to you how big you want your ruffles. If you make smaller strips, you will need  more fabric. When you start cutting the burlap be prepared to have little strings everywhere...in your hair, on the floor, stuck to the dogs butt. Everywhere.


Once you have your strips cut, you can opt to pre-pin your ruffles. I did so only with the burlap. Simply because it was easier to have your ruffles pre-made then to burn off your fingerprints each time you try to hold a ruffle down after hot gluing it. Although if you plan on leading a life of crime after making this tree skirt then go ahead and skip this step.
There is no rhyme or reason to my ruffles...I just kind of did them. I started off thinking I would measure them to make sure they were all the same size, but then I remembered I'm lazy.

Now you are ready to create your skirt. Simply take your old tree skirt and start hot gluing your ruffles to it. Fair Warning: the first layer takes the longest. It honestly took me around an hour for the first layer. It was at this point that I was questioning my sanity. However the subsequent layers go much quicker. If you are able to sew, you can most certainly sew your ruffles on. Why don't you go ahead and brag about it too. But good luck sewing the burlap, I have a feeling it won't be fun.

Alternate your fabrics so it gives depth to the tree skirt. Here is my skirt four layers in. I watched Life of Pi while making my skirt and I cried twice. Once when I burned the crap out of my finger, and once when the tiger was going to die. Poor tiger.

If I haven't scared you completely out of making this tree skirt yet, then let me just reiterate, I would totally do it all over again. Well, I wouldn't watch Life of Pi again, but that has nothing to do with the actual craft.

Once you get done with your skirt you will need to trim all of the loose edges of the burlap. Now remember, this is burlap, and all the 'roughness' of it is part of its charm...so don't go crazy trying to get them all.
Santa better put all my gifts to the side of my tree skirt so he doesn't smoosh it, or he and I may come to blows.

Thursday, December 5, 2013

Christmas Came Early!!!

I'm just minding my own business, sitting on the couch in the same pajamas I've been wearing for two days now when a ray of light shines down on me and a choir of angels fill my ears. It must be a miracle.

GYPSY SISTERS IS BACK FOR A SECOND SEASON!!
It's nearly as good as if they were making a sequel to The Wild and Wonderful Whites of West Virginia. As I have mentioned before I have an affinity for hot messes.

This show has everything you need: ex-strippers, chick fights, mobile homes, blinged out everything, intelligent conversation, a brood of kids so big you can no longer tell who are siblings and who are cousins...and to be honest, I don't think they really care either way. 

As if that wasn't enough, Santa decided I was EXTRA good this year, because Amanda Bynes is free again!! Free to roam the streets lighting fires in driveways. Free to post her every bit of crazy on Instagram.
  Oh, I can only imagine the holiday antics she will get in to, that little rascal!

Wednesday, December 4, 2013

Where's Robin Leach When You Need Him?

Sure, I'm neither Rich nor Famous...but Robin Leach could still do me a solid and help me give a Christmas tour of my home. Alas, I'm on my own...so much for "champagne wishes and caviar dreams". I've completed all of our holiday decorating and figured I would give you guys a sneak peek. While I would love to invite you all over for a drink, that could get a little creepy, seeing as this is the Internet and all. So go ahead and make yourself a hot toddy, then come back to the computer and scroll through these pictures while imagining some delightful banter between us. 

Ahh, I see you've found your way to my front door...you likey? Luckily these poinsettias don't need to last for more than a month because I don't plan on watering them.

  As you make your way through the foyer you will notice that big fake tree. Yep, I'm a fake tree fan. Here's why: My dog, Britney Spears, loves to urinate on nature. Any sort of nature. If there is the tiniest of leaf on the sidewalk, she pees. Why tempt fate? 

The stockings were hung by the chimney weird indent in wall with care.

Please, follow me this way to our living room. Don't worry about going upstairs, it's just a man cave...lame. A craft cave would have been way cooler.

Sit down for a moment and take note of this awesome pillow I got from Pier One. What's better than a Christmas pillow? A Christmas pillow that I sewed Jingle Bells on. You have to add flair to your uniform people.

Now this next picture is a decorating tip I like to call "Put sh*t in sh*t". Try and follow me here...take stuff, and put it in other stuff. Note the bells in the vase, bows and figurines in apothecary jars, and berries in a candle holder. Ta da, you're festive!

Oh, and ornaments in a lantern...that's part of that whole theory also.

This has been Frugal Musing's edition of Lifestyles of the Rich and Famous/Parade of Homes/MTV Cribs minus all the luster and celebrity. Pssh, who wants to see all of that anyways when you can see my $40 Jim Shore figurines.

Tuesday, December 3, 2013

Christmas Mailbox Swag

Think about all the hard work your poor little mailbox does. It gets stuffed full of magazines, bills, credit card applications, and every once in a while a free sample. But what do YOU do for your mailbox? Well, you could dress it up for Christmas! I mean really, we dress up our pets and our houses...why shouldn't our mailboxes have some swag?!

For this craft I went to Jo-Ann Fabric and picked up a plain green swag (it's actually called that) and a couple berry picks. From there I just chose the mid point of the swag and bent the branches opposite ways to depict that mid point. Next I just wrapped the stick part of the berry picks in the middle and draped them down spreading them out along the way.
Super Simple So Far (please read that with a lisp..it makes it a lot more fun!)
Next you need to make a big puffy ribbon for the top. Loop the ribbon around itself A LOT and then cut slits in the middle. I used green wire to attach to the swag and then puffed it out the loops to make my bow.
That's it! You're done! Set that bad boy on top of your mailbox and call it a day. In fact, I got a compliment on mine from my neighbor today...to which I smugly replied "oh thanks, I made that" and then strutted back inside only to find that my ego would no longer fit through the door.


Monday, December 2, 2013

How To Be Ridiculously Good Looking In Every Picture

Do you ever look at pictures of yourself and think:

"Wow, I don't remember being quite that ugly that day"

OR 

"When did I grow a third chin?!"

Some people blame it on not being photogenic, and granted, some are inherently more photogenic than others...but that's why we all need to PRACTICE!

Just follow my simple rules to practicing your posing:

1. Never let anyone catch you practicing in the mirror...it's embarrassing, trust me. 

2. Teach your friends/significant others to always take a picture angled down. Not only will it hide any double chin, but it's also a great party trick to say..."look what I taught them!"

3. When posing with groups, get in the middle!! Never let them stick you on an end. Your skinny friends will bitch about always having to be the end, but you don't really feel bad for them, do you?!

4. When locked safely in the bathroom when no one is home, practice your smile. Don't go full cheese and head on...give yourself a little downward tilt of the chin while still keeping a long neck. It's important to practice this one because there is a fine line between perfection and creepy. 

5. Wipe your face girl!! No one wants to look at a picture of an oily, sweaty mess. Dab it down, especially if you have been out dancing...or simply live in Florida.

6. Master your ugly face. It is inevitable that some one will insist on taking a 'goofy picture'...so you need to be prepared for such an emergency. I like to go to my patented GRR face. I've been using it since 2001 and it hasn't failed me yet. 

Ok...maybe I use that one a little too much...